
The steam hose best practices that actually change outcomes are procedures rather than specifications, and there are six of them.
Specify the duty before the hardware. Get the end connection right for a hose that will creep at temperature. Tag every assembly. Use color coding so a hose is identified by duty. Fit a whip check safety cable at every junction. And run a light maintenance and storage routine that keeps the hose inside the envelope its rating describes.
Each of these steam hose best practices is cheap, each prevents a specific failure, and most plants already run two or three of them. This guide works through all six in order, with the reason behind each and the failure it prevents, then closes with the rules that decide whether the set survives contact with a busy shift.
Scope: these practices apply to rubber steam hose assemblies in saturated or superheated steam service where the duty stays inside the rating of the hose. Above the ISO 6134 Type 2 pairing of 18 bar and 210 °C, the rubber envelope ends and a different hose family applies.
About a 14-minute read at 250 words per minute; each practice stands on its own.

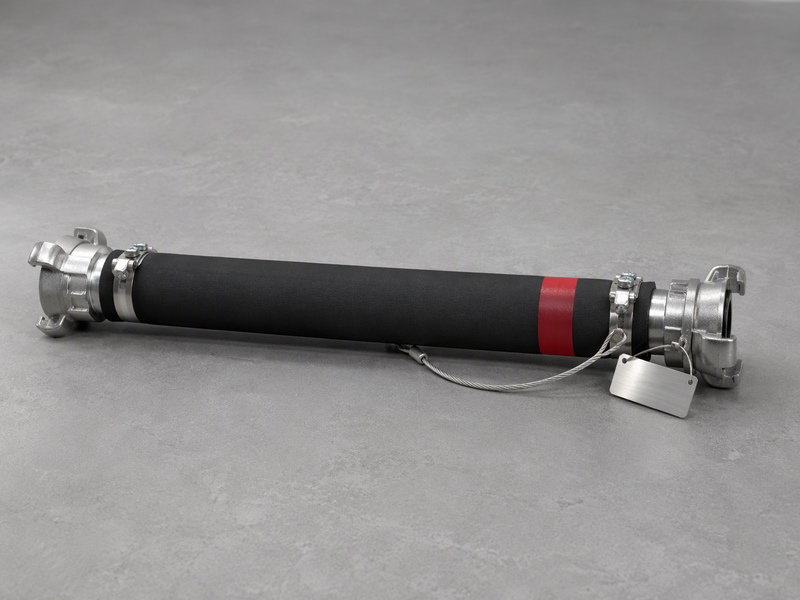
Figure 1. Three of the six practices meet at one joint: the tag on the coupling, the color code on the cover and the safety cable across the connection. The fourth, correct clamping, sits behind the tag and is checked rather than seen.
1. Specify the Steam Hose Duty Before the Hardware
Start with the system rather than the catalog. The four facts that select a steam hose are the maximum pressure the system can deliver, the steam condition at the point of use, the bore and length the tool needs, and the thread the connection uses. Throughout this guide, the end connection means the coupling and clamp that terminate the hose, not the thread alone.
Buying the hardware first and fitting it to the duty afterwards is how a hose gets selected on bore and price, and it is the origin of most of the other five problems.
Why the Relief Setting Sets the Ceiling
The maximum pressure to specify against is the highest the system can produce, which is the relief or reducing valve setting rather than the normal operating figure. A system that normally runs lower can still present its relief setting to the hose on a bad day.
That single substitution changes more specifications than any other. A hose selected against the normal operating pressure has no margin for the event the relief valve exists to cover.
Why the Steam Condition Belongs in the Same Sentence
Saturated steam exists at one temperature for each pressure, so the pressure and the temperature are one statement. A duty temperature that does not match the saturation point for the stated pressure describes superheated steam, which is a different condition.
Stating both together is what lets a supplier answer with one product rather than with a set of options. It also makes the enquiry answerable the same day.
Table 1. The four duty facts that select a steam hose, and what each one prevents.
| Fact | Why it is needed | What goes wrong without it |
|---|---|---|
| Maximum pressure the system can deliver | Sets the size against the relief setting | A hose selected on the normal operating figure only |
| Steam condition at the point of use | Fixes the temperature that goes with the pressure | An assumed temperature, and the wrong envelope |
| Bore and length | Sets flow, weight and the bend layout | Pressure lost at the tool, or a hose too heavy to handle |
| Thread on the connection | Selects the end connection | A fitting that cannot be installed |
2. Get the Steam Hose End Connection Right
The rubber in a steam hose assembly takes compression set at steam temperature and gradually stops pushing back. The clamping load on the shank falls with it, and the joint that was tight at the bench is less tight after the first heat cycles.
The steam hose best practice that follows is short. Use an end connection whose clamping force can be adjusted, and re-check it after the first operating cycles rather than only at the next scheduled inspection.
Crimped assemblies are the other route, and the choice between clamped and crimped belongs to the assembly decision rather than to this list. The steam hose assembly comparison sets out where each applies.
Why Adjustability Is a Requirement and Not a Preference
A connection that can be re-tightened can be brought back to its recorded figure. A connection that cannot has no way to recover the load, which means the joint’s remaining grip is decided on the day it was made.
That is why ISO 6134:2024 requires a steam hose end connection whose clamping force can be adjusted. The standard is what makes an adjustable end fitting a requirement for steam rather than a matter of preference. The same standard is why a quick-release coupling, which cannot be re-tightened, is excluded from steam duty on every bore.
Table 2. End connection practice on a steam hose, and the failure each step prevents.
| Practice | What to do | Failure prevented |
|---|---|---|
| Choose an adjustable end | Use a bolted clamp or an interlocking clamp with its matched bolt kit | A joint that cannot recover its clamping load |
| Re-check after first cycles | Confirm the joints on every assembly after its first heat cycles | A clamp left at its assembly-bench tension |
| Record the figure | Note the maker’s figure on the tag so the next check can repeat it | A joint re-tightened to a guess |
| Keep the bolt kit with the clamp | Store the matched bolts with the clamp body they belong to | An assembly that cannot be rebuilt |
Why the Bolt Kit Is an Operating Issue
Interlocking clamps use non-standard bolts, so a replacement from a general fastener bin will not seat correctly. That makes the matched kit an operating item rather than a purchasing detail: an assembly that cannot be rebuilt for want of a bolt stops the line just as effectively as one that failed.
Keep the matched kits at the bench, in the sizes in service, and keep them out of the general bin.
3. Tag Every Steam Hose Assembly
Of the six steam hose best practices, hose tagging is the one that turns an assembly into a maintained item. Without one there is no installation date, no duty and no next inspection point, which leaves condition as the only trigger for replacement.
The practice is simple. Every assembly carries a tag applied when it is built, and the tag travels with the hose rather than with the paperwork.
What Hose Tagging Should Record
The tag should carry the manufacture date, the installation date, the duty it was selected for, the assembly rating, the end connection type and the next inspection point. Where a clamp is used, it should also carry the maker’s torque figure, because that is the number the next check has to come back to.
Tagging the coupling rather than a separate label is the more durable option on a hose that is handled. A tag on the assembly is also the fastest way to answer the question that arrives months later about what is on a particular line.
Why Hose Tagging Changes the Maintenance Conversation
A plant that can read the age and duty of every assembly on site can plan replacements rather than react to failures. It can also tell whether a hose failed early because of its own duty or because it was moved to a line it was not selected for.
That is the practical value of tagging. It converts an unmanaged collection of hoses into a small asset register with dates on it.
4. Color Code the Steam Hose by Duty
Hose color coding is the fastest identification method on a plant floor, because it does not require reading anything. A cover color tied to a duty lets anyone walking past see whether the hose in a station belongs there.
The practice works only if the scheme is written down and enforced. A color code that lives in one person’s memory is a decoration.
How to Set a Hose Color Coding Scheme
Assign a color per duty, publish the mapping, and apply it at the point where hoses are issued rather than at the point where they are used. Two or three duties are usually enough for a plant, and the mapping should stay stable rather than being revised when a new pressure rating arrives.
Ordering hose with the cover color specified is what makes the scheme practical, because the identification is built into the product rather than added later.
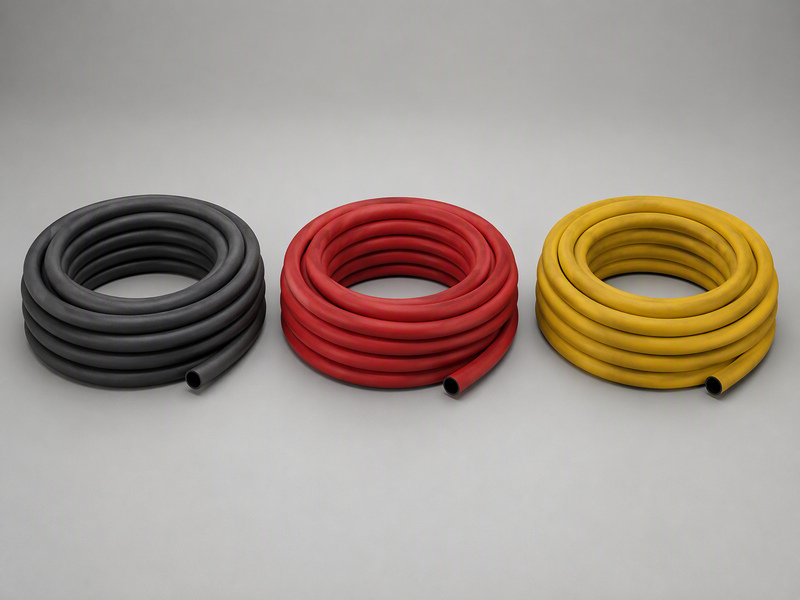
Figure 2. Three cover colors are the physical half of a color code. The mapping that gives each color a duty is published and applied where hoses are issued, not where they are used.
Why Hose Color Coding Is Not a Substitute for Tagging
Color identifies a duty. A tag identifies an assembly. A red cover tells a fitter that the hose is intended for a particular class of work; it does not say how old the assembly is or when it was last checked.
The two practices do different jobs, and a plant that has one usually wants the other shortly afterwards. Color is the fast check at a distance, and the tag is the record that answers the detailed question.
5. Fit a Whip Check Safety Cable
A whip check is a short cable or restraint fitted across a coupling so that if a joint does let go, the two ends cannot separate freely. It does not stop the failure. It stops the failure from becoming an event.
Steam carries far more stored energy than air or water at the same pressure, which is why the consequence of a released joint is treated more seriously on steam than on other services.
Table 3. Where a whip check is fitted and what each installation secures.
| Location | What it secures | Why it matters |
|---|---|---|
| Coupling to hose end | The two halves of the joint | Limits travel if the joint releases |
| Hose to fixed anchor | The assembly against pressure thrust | Stops a released hose from whipping |
| Adjacent lengths in a run | Each joint between lengths | A run has more joints than a single hose |
| Tool connection | The hand-held end | The operator is closest at the point of highest risk |
Why the Cable Goes on Every Junction and Not Just the Risky Ones
The junctions that fail are not always the ones that look loaded. A joint can release because of a clamp that lost its tension, a thread that was never properly engaged, or a seat that was damaged before installation, and none of those is visible from outside.
Fitting the restraint on every junction removes the judgment call about which ones need it. On a plant with repeated hose assemblies, the uniform rule is both cheaper to run and easier to audit.
6. Maintain and Store the Steam Hose
Steam hose maintenance is short: a visual pass and a joint check. The storage routine matters as much, and it is draining, coiling and keeping the hose out of conditions that age the rubber.
Neither routine is technical, and both are the practices that get skipped when a shift is busy, which is why they belong on a written list rather than in a habit.
The Steam Hose Maintenance Pass
Look at the cover for blisters, hardening, cracks or exposed reinforcement. Look at each end for tail movement, rubber extruded past the clamp, or a bolt that has lost its torque. Check the couplings before the assembly goes into service, and at least once every 24 hours during long periods of continuous steaming. ARPM IP-11-1 is the industry guide to this use-and-inspection routine.
Any of those findings takes the assembly out of service. A hose kept in use because it is still holding pressure is a hose whose remaining margin is unknown.
Bring a cold line up to pressure slowly. A fast-opening valve sends condensate into the hose as a slug, and the slug is what loads the joint.
The Storage Routine
Drain the hose after use and leave one end open while it is not in service. Coil it to no tighter than its published bend radius, and never hang it on a hook, because a kink damages the wire layer in a way that does not recover. Keep the store cool, dark and dry, and keep the hose off the floor. A rack or a reel does the job: the coil keeps its shape and nothing rests on the cover.
Hose age is counted from the date of manufacture rather than from the date of installation. Stock is issued oldest first, and a coil that has sat in a hot store is treated as unknown rather than new. As a planning figure, plants commonly replace steam hose in the region of three to five years, and earlier where the duty is severe.
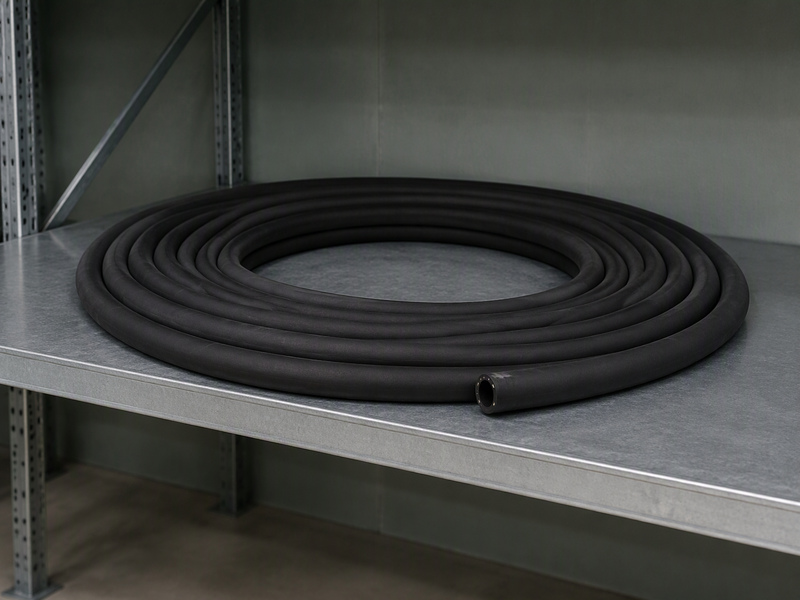
Figure 3. Storage is part of service life. A wide, even coil on a shelf, kept off the floor, is the shape that protects the wire layer until the hose is issued.
What the Six Steam Hose Best Practices Have in Common
The six practices share one idea. Five of them keep an assembly inside the envelope its rating describes. The whip check does something different: it limits what happens when the envelope is breached. All six cost almost nothing to run once they are written down.
The steam hose best practices also reinforce each other. Steam hose maintenance is easier on a tagged assembly that can be checked against its duty, and a color coded hose can be seen to be in the right place. A safety cable is only worth fitting if the joint is inspected. And a duty specified properly in the first place makes all the others easier to apply.
Table 4. The six practices, the failure each addresses, and the effort each takes.
| Practice | Failure addressed | Effort |
|---|---|---|
| 1. Specify the duty first | A hose selected on the wrong figure or the wrong envelope | Minutes at the enquiry stage |
| 2. Get the end connection right | A joint that cannot recover its clamping load | A check after the first heat cycles |
| 3. Tag every assembly | An assembly with no service history | One tag per assembly |
| 4. Color code by duty | A hose in the wrong place, unnoticed | A published mapping |
| 5. Fit a whip check | A released joint becoming an event | One cable per junction |
| 6. Maintain and store properly | Early failure from handling, heat or condensate | A short written routine |
The One Steam Hose Best Practice That Cannot Be Replaced
None of these steam hose best practices replaces a correct start. A hose selected against the wrong pressure, in the wrong envelope, or with an end connection that cannot be re-tightened is a hose that will not be saved by tagging, color coding or a storage routine.
That is why the first of the steam hose best practices carries the most weight. The other five protect a correct decision, and they cannot repair an incorrect one.
Where the Steam Hose Best Practices Should Live
Write these steam hose best practices onto a single page, put it where assemblies are built, and review it once a year. A list that lives on a wall survives a change of shift, a change of supervisor and a change of contractor, and those are the transitions during which unwritten practice disappears.
Top 6 Steam Hose Best Practices FAQs
What is the most important steam hose best practice?
Specifying the duty before the hardware. The other five practices protect a correct selection, and none of them can repair an incorrect one. Getting the maximum system pressure, the steam condition, the bore and length and the thread right at the enquiry stage is what makes everything afterwards straightforward.
How often should a steam hose assembly be checked?
Steam hose maintenance starts with the couplings: check them before the assembly goes into service, and at least once every 24 hours during long periods of continuous steaming. Beyond that, follow the plant’s scheduled interval and re-check the joints after the first heat cycles.
Why does a steam hose joint need re-checking after it is built?
Because rubber held in compression at steam temperature gradually stops pushing back, so the clamping load falls after the first heat cycles. Nothing has been done badly and nothing is broken. The joint simply has less grip than it had at the bench, and it needs to be brought back to its recorded figure.
What should hose tagging record on an assembly?
Six fields, plus the clamp figure. The tag carries the manufacture date and the installation date, the duty the hose was selected for, the assembly rating, which end connection is fitted and when the next inspection falls due. Where a clamp is used, the maker’s torque figure goes on too. Without the duty and the figure, the next check cannot repeat what was done at the bench.
Is hose color coding or tagging more useful?
They do different jobs. Color identifies a duty from a distance without reading anything, which suits a busy plant floor. A tag identifies the assembly and carries its history, which answers the detailed question. Most plants that adopt one add the other shortly afterwards.
Does a whip check prevent a steam hose from failing?
No. It is a restraint fitted across a joint so that if the joint does release, the ends cannot separate freely. It limits the consequence rather than preventing the failure, which is why it works alongside inspection rather than instead of it.
How should a steam hose be stored between jobs?
Drain it, leave one end open, and coil it to no tighter than its published bend radius. Never hang it on a hook, because a kink damages the wire layer. Keep the store cool, dark and dry, and keep the hose off the floor.
How long does a steam hose last?
As a planning figure, plants commonly replace steam hose in the region of three to five years, and earlier where the duty is severe. Age counts from the date of manufacture rather than installation, so the date on the hose is the one that matters for planning a replacement point.
Can a quick-release coupling be used if a whip check is fitted?
No. Steam excludes quick-release ends on every bore regardless of any restraint, because the end connection must allow its clamping force to be adjusted as the rubber takes its compression set. A quick-release coupling cannot be re-tightened, so it fails the requirement whatever else is fitted.
About HENGHUA and Steam Hose Supply
HENGHUA manufactures steam hose, industrial hose and hydraulic hose for plants, distributors and equipment builders worldwide. The steam range uses an EPDM tube and a high-tensile steel wire reinforcement, with an evenly pin-pricked cover so gas that permeates the wall can vent instead of lifting the cover. The EPDM steam hose guide covers the tube compound and how it behaves in steam.
On the fittings side we supply the ground joint coupling family, bolted safety clamps and the matched bolt kits that go with them, so a steam end arrives as a set rather than as parts to be reconciled. Assemblies can be crimped or built with clamps and matching tails, cover colors can be specified for a duty scheme, and every length is proof-tested hydrostatically before dispatch.
Two things we tell buyers plainly. A working rating is only valid inside an envelope, so we ask for the system pressure and the steam condition before recommending a product. And an assembly is only as good as its weakest part, so we quote the assembly figure rather than repeating the hose rating.
If you send the maximum pressure the system can deliver, the steam condition at the point of use, the bore and length, and the thread on the connection, we will confirm the product and the end connection. Please get a quote and free samples, or review the steam hose category and the EPDM steam hose 170 °C product page.
For how the rating on a steam hose is read in service, the steam hose 250 psi guide works through the pressure and temperature pairing. The steam hose fittings guide covers the two hardware families, and the steam hose inspection checklist sets out the checks that follow these practices.



 English
 Spanish
 Portuguese
 French
 German
 Arabic
 Russian
 Indonesian
 Japanese
 Korean