

Most air hose leaks are fixed in under 30 minutes with a hose mender, new O-rings, or fresh thread sealant — no special tools required.
The fastest way to fix an air hose leak is to locate the leak with soapy water, then apply one of three repairs: reseal the fitting, replace the coupler O-ring, or splice the damaged hose section with a hose mender. Most leaks — at the connection, inside the coupler, or through a small puncture in the hose body — take 15 to 30 minutes to repair with less than $10 in parts, and none of them requires replacing the whole hose. This guide shows the full process step by step, from finding the leak to testing the repaired hose at full working pressure.
You will learn why air hoses leak, how to test for air hose leaks, how to repair a leak at the connection, how to fix a hole in an air hose, how to replace a damaged air hose end, when a hose should be replaced instead of repaired, and how to prevent air hose leaks with routine maintenance. We also compare temporary and permanent air hose leak repair methods and answer the questions people search most.
In This Guide
- What Causes an Air Hose Leak?
- What You Need to Repair an Air Hose
- How to Find an Air Hose Leak
- How to Fix an Air Hose Leak at the Connection
- How to Fix a Hole in an Air Hose
- How to Repair an Air Hose End or Replace a Damaged Fitting
- Temporary vs Permanent Air Hose Repairs
- When to Replace an Air Hose Instead of Repairing
- How to Prevent Air Hose Leaks
- FAQ: Air Hose Leak Questions, Answered
- About HENGHUA and Our Testing
1. What Causes an Air Hose Leak?
Air hose leaks happen at four points — the hose body, the end fitting, the coupler, and the compressor connection — each for a different reason. Fixing the wrong point is the most common reason a repair does not hold, so before you learn how to fix an air hose leak, check all four locations in order.
In HENGHUA’s returned-hose reviews, five root causes account for nearly all air hose leak problems:
- Punctures and abrasion damage — the hose is dragged over sharp edges, run over by wheels, or pinched between equipment. This is the most common cause of a hole in an air hose body.
- Loose or overtightened fittings — NPT threads back off under vibration, or a fitting is tightened so hard the threads gall and lose their seal.
- Worn coupler O-rings — the rubber seal inside a quick-connect coupler hardens or nicks, so air escapes around the plug even when the coupler looks closed.
- Ozone and UV cracking — rubber and some PVC hoses stored in sunlight develop fine surface cracks that grow into pinhole leaks over time.
- Age and flex fatigue — repeated coiling, kinking, and pressure cycles weaken the tube wall at the same spot until it weeps.
| Leak Location | Typical Cause | Best Fix |
|---|---|---|
| Hose body (puncture or crack) | Abrasion, pinching, ozone cracking | Splice with a hose mender, or replace the hose |
| Threaded connection (hose to fitting) | Loose threads, missing sealant, galling | Retighten, then reseal with PTFE tape or thread sealant |
| Quick-connect coupler | Worn or nicked O-ring, worn plug seat | Replace the coupler O-ring or the coupler itself |
| Compressor outlet / reel swivel | Vibration loosening, failed swivel seal | Retighten; replace swivel seal or reel end |
Leaks are not just annoying — they are expensive. U.S. DOE compressed-air leak estimates show that a 1/16-inch hole at 100 PSI wastes roughly 3.5 cubic feet per minute (CFM); a 1/8-inch hole wastes about 14 CFM, and a 1/4-inch hole about 57 CFM. On an air compressor running 8 hours a day, a single unrepaired 1/16-inch leak can add meaningful electricity cost over a year — the exact amount scales with runtime and local electricity price. That is why locating the leak precisely — covered in Section 3 — is the first real step of any air hose leak repair.
2. What You Need to Repair an Air Hose
All four repairs in this guide use the same basic toolset. Most items are already in a home workshop, and the total cost of the parts you are missing stays under $20 — cheaper than a new hose. If this is your first air hose repair, treat the following table as your shopping list: every item is available at a hardware store.
| Tool / Part | Used For | Typical Cost |
|---|---|---|
| Spray bottle + dish soap | Finding the leak (bubble test) | $2 |
| Two wrenches | Retightening and counter-holding fittings | $15 (if not already owned) |
| Utility knife | Cutting out damaged hose sections | $5 |
| Hose mender (match hose I.D.) | Splicing punctures and cracks | $3–$6 |
| Hose clamps (two per splice) | Locking the mender into the hose | $1 each |
| PTFE (polytetrafluoroethylene) tape or thread sealant | Resealing threaded connections | $3 |
| O-ring + pick tool | Replacing a leaking coupler seal | $0.05–$0.20 / $4 |
An air hose leak repair kit bundles the menders, clamps, and sealant for this job — see our repair kits.

3. How to Find an Air Hose Leak
Knowing how to fix an air hose leak is only half the job — you first have to find the leak. Most leaks are small enough that you cannot see them, so rely on sound and bubbles rather than your eyes. Work through the checks in the following list in order, from fastest to most thorough.
- Listen. Turn on the air compressor, pressurize the hose, and walk along its length. A hissing sound usually pinpoints the leak within a few inches; coupler and fitting leaks hiss at the joint itself.
- Feel. Run your hand slowly along the hose and over every connection. A small leak feels like a cold draft on your skin — most noticeable with bare hands at 90 PSI or more.
- Run the soapy water test. Mix a few drops of dish soap in a spray bottle of water. Spray every joint, the coupler body, and the full length of the hose. The leak appears as a cluster of bubbles that keeps growing while the air is on.
- Check the pressure gauge. Close the air supply, note the gauge reading, and time how fast the pressure drops. A quick pressure drop with no visible bubble means a leak inside the coupler or under a fitting — disassemble and inspect the seals.
The soapy water test is the most reliable way to find a small air leak: bubbles grow at the exact escape point while the hose is pressurized.
The soapy water test is the standard method used in workshop practice because it works on every hose material and every fitting type. Run the test at full working pressure — a leak that stays hidden at 40 PSI often shows clearly at 90–150 PSI, which is where your compressor actually operates. Once the bubbles stop growing in one spot, mark it and move to the matching repair section.

4. How to Fix an Air Hose Leak at the Connection
Most readers searching for how to fix an air hose leak are actually dealing with air hose leaking at the connection — the threaded joint between the hose end and the fitting, or the quick-connect coupler on the tool side. These are also the easiest leaks to repair: no hose cutting is needed in most cases.
Two sealing principles matter here. NPT (National Pipe Thread) fittings, the standard for air tools and couplers, seal by thread interference — the tapered threads wedge together as they tighten, per ANSI/ASME B1.20.1 — so a clean, correctly tensioned joint is what stops air. Quick-connect couplers, by contrast, seal with an O-ring inside the socket; when that O-ring hardens or nicks, the coupler leaks no matter how tight the threads are.
Step 1: Tighten first, measure second
Use two wrenches — one on the fitting, one counter-holding the hose end or coupler body — and tighten the joint one quarter to one half turn. Many leaks stop here. The classic sign of air hose leaking at the connection is a hiss that comes back after you retighten — that points to a worn seal or thread, not a loose one. If the leak persists, stop at 1.5 turns past hand-tight and switch to resealing — tightening further strips the threads or cracks the fitting body, turning a ten-minute fix into a replacement job.
Step 2: Reseal the threads
If tightening does not stop the leak, remove the fitting and clean the NPT threads with a rag or solvent, then apply PTFE (polytetrafluoroethylene) tape or a liquid thread sealant rated for compressed air. Wrap PTFE tape two to three turns in the direction of the threads (clockwise when viewed from the fitting end) so it does not unravel as you screw the parts together. Thread sealant is a good alternative on brass and steel fittings; apply a thin even coat to the male threads and assemble immediately.
Step 3: Replace the O-ring in a leaking air hose coupler
A coupler that hisses when the plug is inserted, or leaks air around the sleeve, almost always needs a new O-ring — not more torque. Remove the socket from the line, pry the old O-ring out with a pick, and push a new one of the same size into the groove. Check the plug’s seat for wear or burrs at the same time; a scratched seat will cut the new seal within days. O-rings cost a few cents each (typically $0.05–$0.20), and most workshop couplers in 1/4-inch and 3/8-inch sizes take a standard O-ring that any air hose leak repair kit covers. Scope note: non-standard or imported couplers may use different O-ring sizes — match the original O-ring before ordering a replacement.A leaking air hose coupler is usually cured by replacing its O-ring — the number-one quick-connect failure we see on returned products.
After any connection repair, reconnect everything and retest with soapy water before use. If air hose leaking at the connection survives fresh sealant and a new O-ring, the fitting or coupler body itself is worn — replace the part rather than stacking sealant. For a deeper look at thread types and coupler compatibility, our air hose fittings guide covers NPT, quick-connect, and barbed systems in detail.
My air hose keeps leaking where it connects to the compressor even after I tightened it — what is the permanent fix?
Yes — a leak that survives retightening is a sealing problem, not a torque problem. Reseal the threads with PTFE tape or thread sealant (Steps 4.1–4.2 in Section 4). If it still leaks after fresh sealant, the reel swivel seal is likely worn — a worn swivel seal leaks at a rotating joint and needs replacement, not more sealant (see Q5). A scratched fitting seat is the other cause and also needs a part replacement. A fitting damaged beyond resealing should be replaced — a new fitting restores a factory-grade connection at a fraction of the cost of a new hose.
5. How to Fix a Hole in an Air Hose
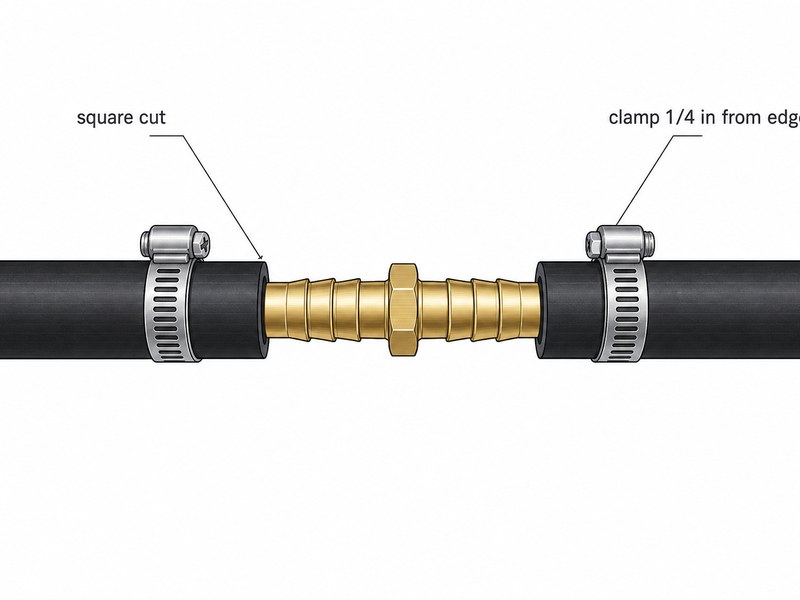
When the leak is in the hose body itself, how to fix an air hose leak comes down to one part: a hose mender — a barbed metal or brass union that joins the two cut ends. When the mender size matches the hose inner diameter and both clamps are tightened correctly, a proper splice is as strong as the original hose and holds full working pressure; it is the standard permanent repair for punctures and short cracks.
A hose mender works by friction and clamping, not glue. The barbs bite into the inner wall of the hose, and a hose clamp on each side squeezes the outer wall against the barbs. This is why the mender size must match the hose inner diameter (I.D.) — a 3/8-inch air hose takes a 3/8-inch mender, and forcing a larger mender into a smaller hose splits the tube instead of sealing it.
- Depressurize completely. Turn off the compressor, open the tool end to bleed the line, and confirm zero gauge pressure. Never cut a pressurized hose — the line whips and can cause serious injury.
- Cut out the damaged section. Use a sharp utility knife to remove about 2 inches of hose centered on the damage, making each cut square to the hose axis. A square cut matters: an angled cut lets the clamp and barbs seat unevenly and leak.
- Deburr the ends. Wipe the cut ends and remove any loose rubber or loose textile strands from the bore so the mender slides in cleanly.
- Insert the hose mender. Push one cut end fully onto the mender barbs — the hose should reach the mender’s shoulder. Slide a hose clamp over each end before you insert the second side.
- Clamp both ends. Position each clamp about a quarter inch from the cut edge and tighten until snug, then a little more — the clamp should compress the hose into the barbs without crushing it. Test with soapy water at working pressure.
Correct splice layout: barbed hose mender centered in the hose, one hose clamp per side, each placed just back from the cut edge.
An air hose leak repair kit bundles everything needed for this job — brass menders in 1/4-inch, 3/8-inch, and 1/2-inch sizes, hose clamps, and a tube of thread sealant — which costs less than a new hose and covers most repair scenarios in a home workshop. Check our air hose size chart to confirm your hose I.D. before buying a mender. If you want to know how to repair an air hose correctly the first time, matching the mender to the I.D. is the rule that decides success.
I punctured my rubber air hose with a nail — can I splice it myself, and what size mender do I need?
Yes — a single puncture in a rubber air hose is one of the easiest repairs to do yourself. Measure the hose inner diameter first: a 3/8-inch air hose takes a 3/8-inch hose mender, and a 1/4-inch hose takes a 1/4-inch mender. Then complete five steps: depressurize, cut out the damaged section, deburr, insert the mender, and clamp both ends. Test with soapy water at working pressure before putting the hose back in service.
6. How to Repair an Air Hose End or Replace a Damaged Fitting
If the damage sits at the very end of the hose — a bent barb, a cracked ferrule, stripped threads, or a fitting that leaks after repeated tightening — the correct move is to replace the air hose fitting rather than the whole hose. Replacing an end fitting gives the hose a new, factory-grade connection and usually takes less time than a splice.
Two fitting styles are common on consumer and light-industrial air hoses. Crimped fittings are pressed onto the hose at the factory and cannot be reused; when one leaks, you cut it off and replace the end with a reusable barbed fitting. Barbed or push-on fittings slide into the hose bore and are secured with a hose clamp, making them the standard field-replaceable option for compressed air systems. When you replace an air hose fitting, always match it to the hose I.D. and buy a fitting rated at or above the hose working pressure.
- Cut off the old fitting. Depressurize the line, then make a square cut just behind the damaged ferrule or barb, removing it completely.
- Clean the hose end. Wipe off oil and debris, and trim any loose reinforcement threads that would prevent a clean clamp seat.
- Slide on the clamp first. Place a new hose clamp over the hose before inserting the barb — forgetting this step means taking the fitting back out.
- Push the new fitting onto the hose. Apply a little soapy water or a drop of air-tool oil to the barbs to ease insertion; push until the hose seats against the fitting shoulder.
- Tighten the clamp and test. Position the clamp over the first barb, tighten, and pressure-test the joint with soapy water.
Thread quality matters on the new fitting as well. NPT threads should be clean, sharp, and free of burrs — a damaged thread will leak even with fresh PTFE tape. When in doubt, replace the air hose fitting with a new brass unit; a fitting costs a few dollars, while a new hose costs far more. Brass barbed fittings are the durable default for workshop use; plastic fittings save weight on hobby setups but crack sooner under repeated wrenching. This end repair is also the fix for a common air hose selection mistake: a hose cut to length for a new tool with an end fitting that never matched the hose size.
7. Temporary vs Permanent Air Hose Repairs
A complete answer to how to fix an air hose leak includes knowing which repairs are temporary and which are permanent. The two are not interchangeable: temporary methods keep a tool running for a few hours, while permanent methods restore the hose to rated service. Using the wrong one on a high-pressure line is a safety risk, not just a shortcut.
Electrical tape, duct tape, and rubber repair tape are temporary measures only. Tape cannot carry the load of a pressurized hose wall; it works by bridging the leak for a short time, and it fails as soon as the tape loosens, the pressure spikes, or the hose flexes. Treat taped repairs as emergency-only: finish the current job, mark the hose, and do the permanent splice or replacement before the next use. For a lasting air hose leak repair, use a hose mender or a new fitting — never tape.
| Repair Method | Durability | Pressure Rating | Best For |
|---|---|---|---|
| Tape (electrical, duct, rubber) | Hours to a few days | Low; not rated for working pressure | Emergency finish of a current job only |
| Hose mender splice | Years; as strong as the hose | Full hose working pressure when clamped correctly | Punctures and short cracks in the hose body |
| End fitting replacement | Years; new factory-grade connection | Full rated pressure when sized and clamped correctly | Damaged barbs, ferrules, or stripped threads |
| New hose | Full service life | Rated by manufacturer | Multiple defects, aged hose, or low rated pressure |
Air hoses are pressure vessels: burst pressure is normally three to four times the working pressure rating, which is the safety margin that lets you notice wear before a failure. That margin only exists if the repair restores the wall. Compressed air system safety guidance (ISO 4414) assumes every component is rated for the system pressure and inspected regularly — a taped leak is neither rated nor reliable. On high-pressure industrial lines, operators also add whip-check safety cables so a failed coupler cannot whip the hose end; the same thinking applies at home: any repair you cannot test at full working pressure is not a repair you should trust.
8. When to Replace an Air Hose Instead of Repairing
Sometimes the correct answer to how to fix an air hose leak is not to repair it at all. A splice is only as good as the hose around it, and several conditions mean the hose itself has reached the end of its service life. Replacing a $15–$50 hose (typical consumer range by length and material) is cheaper and safer than repairing a hose that will fail again in the same area.
- Reinforcement is exposed. If you can see the textile braid or spiral at a crack, the pressure-bearing layer is already compromised — a mender will not restore it.
- Multiple defects in one section. Two or more cracks, punctures, or soft bulges within a few feet indicate the tube wall is degrading, not damaged.
- Ozone cracking across the surface. Fine weather-checking cracks over most of the hose mean the cover and tube are perishing; new leaks will keep appearing.
- Kink damage. A permanently flattened section from repeated kinking has weakened the reinforcement and cannot be fully restored by splicing around it.
- Wrong pressure rating. If the hose is rated below your compressor’s maximum output — for example, a 150 PSI hose on a compressor that can deliver 175 PSI — replacement with a correctly rated hose is mandatory, not optional.
- Repair cost approaches replacement. If the damaged section is long or the hose is short, a mender plus labor can cost more than a new hose of the same length.
Use this table to decide in under a minute how to fix an air hose leak — or when replacing the hose is the right call:
| Hose Condition | Action |
|---|---|
| Single puncture or short crack, hose relatively new | Splice with a hose mender |
| Leak at a threaded connection or coupler | Retighten → reseal threads → replace O-ring |
| Damaged end barb, ferrule, or stripped threads | Replace the end fitting |
| Exposed reinforcement, multiple defects, ozone cracking, kink damage, or wrong pressure rating | Replace the whole hose |
As a general industry rule, consumer rubber air hoses stored indoors and used daily typically serve 5–7 years before the tube wall starts to degrade, and direct-sun storage shortens that period significantly. Age alone is not the deciding factor — check for the replacement conditions listed in this section, and once several leaks appear at once, treat the hose as a consumable and replace it. When choosing a replacement, match the working pressure to your compressor and the size to your tools — our rubber vs PVC air hose comparison explains the material trade-offs, and you can browse our air hoses by pressure rating.
Is it worth repairing an old air hose that leaks in two places, or should I just buy a new one?
Replace it. Two or more leaks in different spots mean the tube wall is degrading rather than damaged, and a second leak usually appears shortly after the first repair. A new consumer air hose costs roughly $15–$50, while two splices cost almost the same in parts and labor — and leave a hose that can still fail elsewhere. For a workshop owner, downtime makes the calculation even clearer: replacing the hose outright is usually faster than a multi-splice repair, so keep one spare hose rated for your system pressure in stock.
9. How to Prevent Air Hose Leaks
Prevention is the last piece of the puzzle in how to fix an air hose leak — a hose that never develops a leak needs no repair at all. Most leaks we see on returned hoses were avoidable with basic habits, and none of them cost anything.
- Store the hose coiled and out of the sun. UV and ozone are the main enemies of rubber covers; a coiled hose in a shaded hook or cabinet lasts years longer than one left on the floor in sunlight. Polyurethane air hoses tolerate UV far better than rubber or PVC.
- Never drag the hose over sharp edges. Abrasion cuts the cover first, then the reinforcement — the classic start of a future puncture. Use an air hose reel or drag protection where the hose crosses concrete or metal.
- Keep fittings and couplers clean. Grit in a quick-connect socket scratches the O-ring seat; wipe plugs before insertion and keep dust caps on unused couplers.
- Use the correct size and pressure. Oversized or undersized hoses both cause problems: undersized hoses starve tools and run hot; undersized couplers restrict flow; a hose rated below the compressor output is a failure waiting to happen.
- Replace O-rings at the first sign of wear. A leaking air hose coupler is a two-minute, few-cents fix when caught early — leave it, and the coupler seat wears until the whole coupler needs replacement.
- Avoid kinks. A kink permanently flattens the reinforcement; if your hose kinks often, switch to a kink-resistant polyurethane or hybrid hose for that application.
Routine checks make air hose leak repair a rare event instead of a monthly chore, and the same routine protects the compressor side of the system. Air hose leaking at the compressor outlet usually means the connector vibrated loose or the reel swivel seal wore out. The fix: tighten the outlet fitting with the compressor off, replace the swivel seal when it weeps, and check the outlet joint as often as your tool-side fittings.
10. FAQ: Air Hose Leak Questions, Answered
These are the air hose leak questions we hear most from workshop users — with the short answers first.
Q1. Why does my air hose keep leaking at the coupler?
A leaking air hose coupler is almost always a worn or nicked O-ring inside the socket, or a scratched seat where the plug rides. Replace the O-ring first — it costs cents and takes two minutes. If the leak returns immediately, inspect the plug and socket seat for burrs and replace the coupler if the seat is scored.
Q2. Can I use tape to fix an air hose leak?
Tape is a temporary, emergency-only measure. It cannot hold working pressure reliably, so a taped air hose should be used only to finish the current job, then permanently spliced with a hose mender or replaced. High-pressure compressed air lines must be repaired with rated components; tape is acceptable only for low-pressure, emergency use.
Q3. How much does it cost to repair an air hose?
A DIY repair with an air hose leak repair kit costs about $5–$15 for the kit — the price of brass menders, clamps, O-rings, and sealant, and one kit covers multiple repairs. A single splice uses less than $10 in parts from that kit. A new consumer air hose typically costs $15–$50 depending on length and material, so repairing a punctured hose with a kit is almost always the cheaper option unless the hose is aged or badly damaged.
Q4. Can I repair a rubber air hose the same way as a PVC air hose?
Yes — both take a hose mender splice identically, as long as the mender matches the hose inner diameter. The difference is in prevention: rubber hoses need protection from ozone and UV, while PVC air hoses stiffen in the cold and are more likely to kink. Neither difference changes the splice procedure.
Q5. Why does my air hose keep leaking at the hose reel swivel?
A leak at an air hose reel swivel almost always means the swivel seal is worn — a rotating joint cannot seal with a flat or nicked O-ring. Replace the swivel seal or the reel end fitting; if the leak is at the swivel body itself, the reel’s internal seal assembly needs service. Vibration loosening is the second cause, so recheck the outlet joint after heavy use.
Q6. How long does a repaired air hose last?
A properly spliced hose — square cuts, matched mender size, correctly placed clamps — lasts as long as the surrounding hose material, typically years of regular workshop use. The repair is not the weak point; the age and condition of the hose around it is. If the hose was already ozone-cracked or aged, the repair will outlive the hose, and replacement is the better call.
11. About HENGHUA and Our Testing
HENGHUA is a manufacturer of air hoses, hydraulic hoses, hose assemblies, and connecting fittings — including the rubber air hoses, barbed menders, quick-connect couplers, and repair kits referenced throughout this guide. The repair methods in this guide come from our own factory testing: we pressure-test spliced hoses to rated working pressure, cycle couplers to measure O-ring life, and review returned hoses to identify which failure modes the field actually produces. The five root causes in Section 1 are the same patterns our quality-control data shows.
Every air hose we ship is checked against the failure points described here: cover abrasion resistance is tested on a standardized rubbing fixture, burst pressure is verified on sample production lots, and coupler O-rings are cycled repeatedly to confirm seal retention before packaging. Our guidance is intentionally honest about limits — a hose is a consumable, and no repair or product lasts forever. We specify exactly when repair makes sense and when replacement is the right call.
- Factory-direct supply — consistent pricing and lead times for distributors, retailers, and brands; request current capacity and lead-time figures with your quotation.
- Complete air hose range — rubber, PVC, and polyurethane air hoses in 1/4-inch, 3/8-inch, and 1/2-inch sizes, typically rated 200–300 PSI depending on model — confirm the rating printed on your hose or request the spec sheet.
- Matching components — barbed menders, quick-connect couplers, O-rings, clamps, and repair kits sized to our hose line, so repair parts match the hose you buy.
- OEM / ODM service — custom hose lengths, colors, end fittings, and private-label packaging for your brand; minimum order quantities vary by product, so ask our sales team for current MOQ terms.
- Engineering support — leak diagnosis, fitting compatibility confirmation, sample testing, and technical documentation for your catalog; certification and test reports are available on request.
Before you place an order, our engineers will confirm that every hose and fitting matches your application. Send us a photo of your leaking hose or failed joint and we will identify the cause — puncture, worn O-ring, or loose thread — and recommend the correct repair part or replacement, usually within one business day. View our air hose repair kits or contact the HENGHUA engineering team for a quotation and request free samples to verify fit on your own equipment. If recurring air hose leaks cost your workshop time and air, we can also help you select a hose construction that resists the specific failure mode you keep seeing — so you never have to learn how to fix an air hose leak twice.

 English
  Spanish
  Portuguese
  French
  German